NEON Postgres in QGIS

Over this post, I'll show you how to create a PostgreSQL database using Neon, install PostGIS on it, connect to it using QGIS 3, and run some simple SQL queries before sharing the database with others collaborators.
If you've ever been involved in a collaborative project which involves spatial data you might well have experienced the pain of trying to develop an accessible, robust and open-standard solution for your project's spatial needs. In my experience, it needs to be robust (i.e. be a proper relational database, complete with constraints, foreign keys and roles etc.), spatial (i.e. handle spatial data properly with dedicated data types and spatial indexing etc.), open-source (i.e. stored in some kind of simple text-based, well-supported, open-source language to adhere to FAIR principles and meet basic standards for long-term archiving and reuse), and also be built to handle concurrent editing and updates so that everyone can collectively contribute to a centrally-hosted dataset, without resorting to the hellscape of sending multiple files via email and asking someone (me) to ensure the database incorporates the various, potentially conflicting updates people have made over the weekend.
True, there are now portable, single file based solutions such as the amazing DuckDB or the older SQLite approach, which might easily be hosted on a networked drive or cloud provider such as Dropbox or OneDrive, but there are issues with this kind of DIY solution including handling concurrent edits. Traditionally, a PostgreSQL database with PostGIS installed running on a server somewhere would be the go-to solution for enabling everyone to input into a single, centrally hosted project database. Previously, I've tackled this by spinning up a PostgreSQL + PostGIS server on a dedicated machine, physically located within my university on running on the local network. This is all well and good when everyone knows how to use the university VPN but what if your collaborators are based at different institutions, or god forbid, one or more people involved leave said university at some point and lose access to the VPN and hence the database.
In many ways, it would be better to host this spatial database on some kind of publicly accessible endpoint, assuming the data you are hosting is permitted to be stored outside of the university ecosystem (and indeed outside of your host country). Enter Neon, a free (at low usage), accessible service for hosting your PostgreSQL database in the cloud. I'm in no way affiliated with Neon but just am genuinely blown away by the utility of this service and its relative ease of use, so wanted to share the process for anyone else facing similar issues. I should add that I make no claims about the longevity of Neon as a service, however, if you decide to move away from Neon, its also easy enough to download an export of your PostgreSQL database and run it wherever you choose.
First thing first, you'll need to sign up for a free account on Neon and create a new project using the web interface. From the project dashboard here, you can create a new database by hitting the "Connect" button and then selecting 'Create new database' in the drop down select menu.
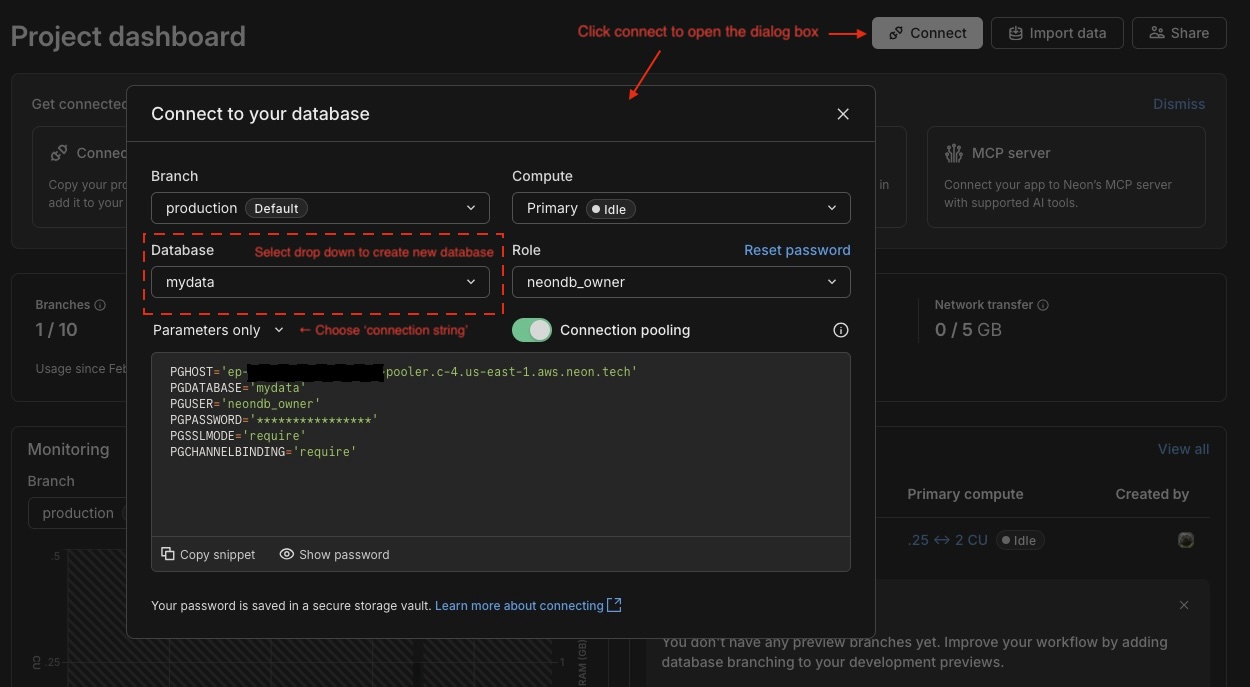
With the database created, we can connect to it from our local machine through a variety of client applications, such as simple command line tools like psql, or a more powerful,fully-fledged database administration clients like the excellent DBeaver Community Edition. Handily, Neon offers differently formatted versions of your database connection parameters via a drop down menu accessible from the "Connect" dialog box. Select the "Connection string" drop-down option and you'll see something like this:
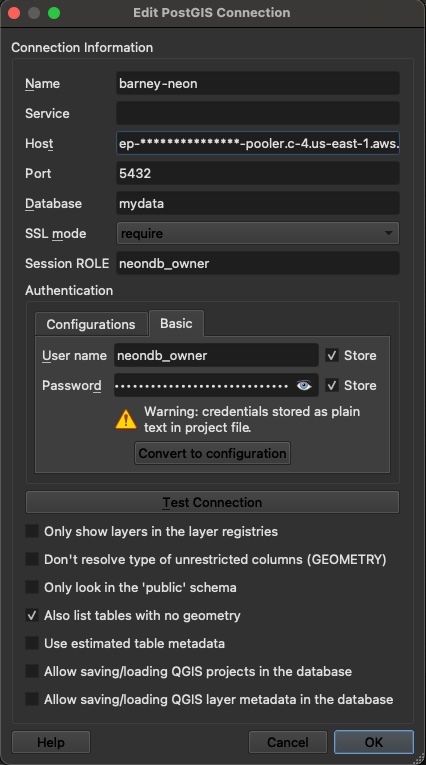
For now, we will load up QGIS and connect to our new database using that. Add a new PostgreSQL connection by right-clicking on PostgreSQL in the Browser window and selecting the option. You'll be faced with a connection dialog box which you should be reasonably comfortable filling out using the information provided from the Neon "Connection string" output, discussed above. You can call the name of connection whatever you like, perhaps something like 'My Neon DB' would be suitable. All good, except if you are using QGIS 3.40.5 or earlier (or later, I haven't yet checked) you will need to make a change in the password field, because otherwise you will encounter a connection error about the endpont not being specified. Credit to Neon for putting together that very helpful help page describing this issue and its various solutions. Given I can't find any way to cleanly specify custom database connection parameters from QGIS, I had to adopt the dirtiest workaround given: prepending the endpoint address to the password within the password field, using the format endpoint=[endoint];[password]. You can find your endpoint address just after the "@" symbol in your connection string and it will start with ep-. Bang that in, set SSL mode to require, and I also like to check 'Also list tables with no geometry'.
All being well you can now connect to your Neon database. Load up the QGIS 'DB Manager', accessible under the 'Database' file menu, and you should see your database connection listed under "PostGIS". Expand the file tree to connect to the database and you should see your default "Public" schema listed. Selected this schema and hit the "SQL Window" button, then enter the following in the free text field and hit the "Execute" button beneath.
create extension postgis;
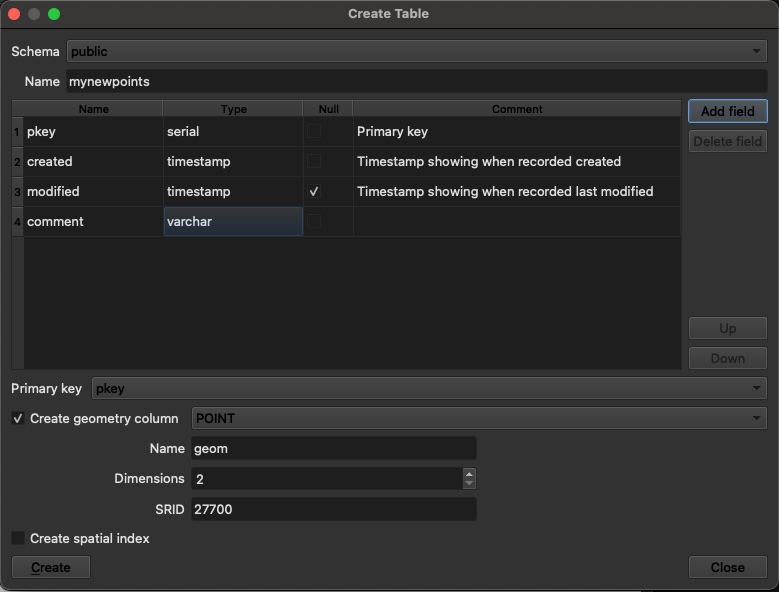
You should see the output CREATE EXTENSION to confirm that PostGIS has been installed and, after refreshing the tables, see 'geography_columns', 'geometry_columns' and 'spatial_ref_sys' listed within your 'public' schema. Fantastic, we've just installed postgis into the default location of the 'public' schema within your database. Let's go ahead and create a new spatial table by clicking the 'Table > Create a table' menu item from within the QGIS DB Browser extension. This is all fairly standard stuff but whatever you do, just ensure you create a field of type serial to handle your primary key. In this example I'm going to create table called mynewpoints and give it a serial primary key field (pkey), two fields of type timestamp (created, modified), and one varchar text field (comments) for extensive written comments. Critically, I've also checked 'Create geometry column', set it to POINT and added 27700 (the EPSG code for the British National Grid CRS). I won't tick the box to create a spatial index for this table but this is worth doing for very large datasets to speed up spatial queries.
Before I load my layer into QGIS, I'm going to run a few queries to improve the database behaviour. First, lets alter those timestamps so that the default values are set to the current system time at creation:
ALTER TABLE public.newdata ALTER COLUMN created SET DEFAULT now();
ALTER TABLE public.newdata ALTER COLUMN modified SET DEFAULT now();
Then, we'll define a function to update the modified field with the system time during any updates to the row, which includes updated or modifications to the geometry column. This can be super useful for understanding when data were created and when edits were made. It would also be possible to define a similar function whereby the username of the editting user could also be logged against the timestamp. With Postgres, the sky is the limit...
<!--Define the update function-->
CREATE OR REPLACE FUNCTION public.update_modified_column()
 RETURNS trigger
 LANGUAGE plpgsql
AS $function$
BEGIN
    NEW.modified = now();
    RETURN NEW;
END;
$function$
;

<!--Create and set the function to trigger on our new table modified field-->
CREATE TRIGGER mynewpoints_update_modified BEFORE
UPDATE
    ON
     FOR EACH ROW EXECUTE FUNCTION update_modified_column()
     ;
Execute those queries as above, and then double-click the layer to add it the to QGIS Layers Panel. Have a play around adding new and modifying existing points and you should see the database rules and triggers in action! Finally, explore creating additional users and roles back at the Neon dashboard, and dish out the appropriate credentials to your collaborators. This way you can offer various people read, write or a mixture of fine-grained table permissions across the database and as long as they know how to use QGIS, they know how to contribute to the database. Awesome!